Windows Installation
This page contains installation instructions for Windows.
Prerequisites Checklist
Before starting the installation, confirm all of the following are in place:
- Windows Server 2019 or 2022 (64-bit) — or Windows 10/11 for local development. This guide does not cover 32-bit environments.
- IIS 10+ with CGI feature enabled — the CGI role is required for PHP FastCGI. Enable it with:
Enable-WindowsOptionalFeature -Online -FeatureName IIS-CGI - PHP 8.1 or 8.3 — use the Non-Thread-Safe (NTS) build for IIS/FastCGI deployments. Download from windows.php.net.
- Composer — PHP dependency manager. Download the installer from getcomposer.org.
- Git for Windows — required to clone the DreamFactory repository. Download from git-scm.com.
- Visual C++ 2015–2019 Redistributable — required by PHP and its extensions on Windows. Download from Microsoft.
- URL Rewrite Module for IIS — required for Laravel's routing. Download from Microsoft.
- Supported system database — for the DreamFactory system database, use SQLite (default, easiest), MySQL 8.0+, PostgreSQL 13+, or SQL Server. SQLite requires no additional setup and is recommended for initial installation.
- Local Administrator account — IIS needs elevated permissions for directory access and FastCGI configuration.
- DreamFactory license key — required for Enterprise edition. Contact DreamFactory support if you do not have one.
The server must not have any other IIS/web applications running on it in order to work with DreamFactory. You must be able to access the GUI of the server using something like RDP, have the ability to transfer files from your client machine to the server, and it is recommended to turn IE enhanced security off to make downloading some of the necessary installation files easier. Other applications might be able to run on the same IIS instance as DreamFactory, however this is not typically supported.
A local Administrator account is also required at minimum for testing permissions, and possibly in perpetuity for IIS permissions.
Server role setup
To start, set up the IIS Web server roles.
To enable the Web Server Roles:
- Open the Server Manager Application.
- Click on Option 2 Add roles and features.
- Click Next.
- Ensure that Role based or feature based is selected, and click Next.
- Ensure the server you're working on is selected, click Next.
- On server roles, check the Web Server (IIS) box, install any admin tools if asked, and click Next.
- Your Web Server Role should look something like this (also outlined below):
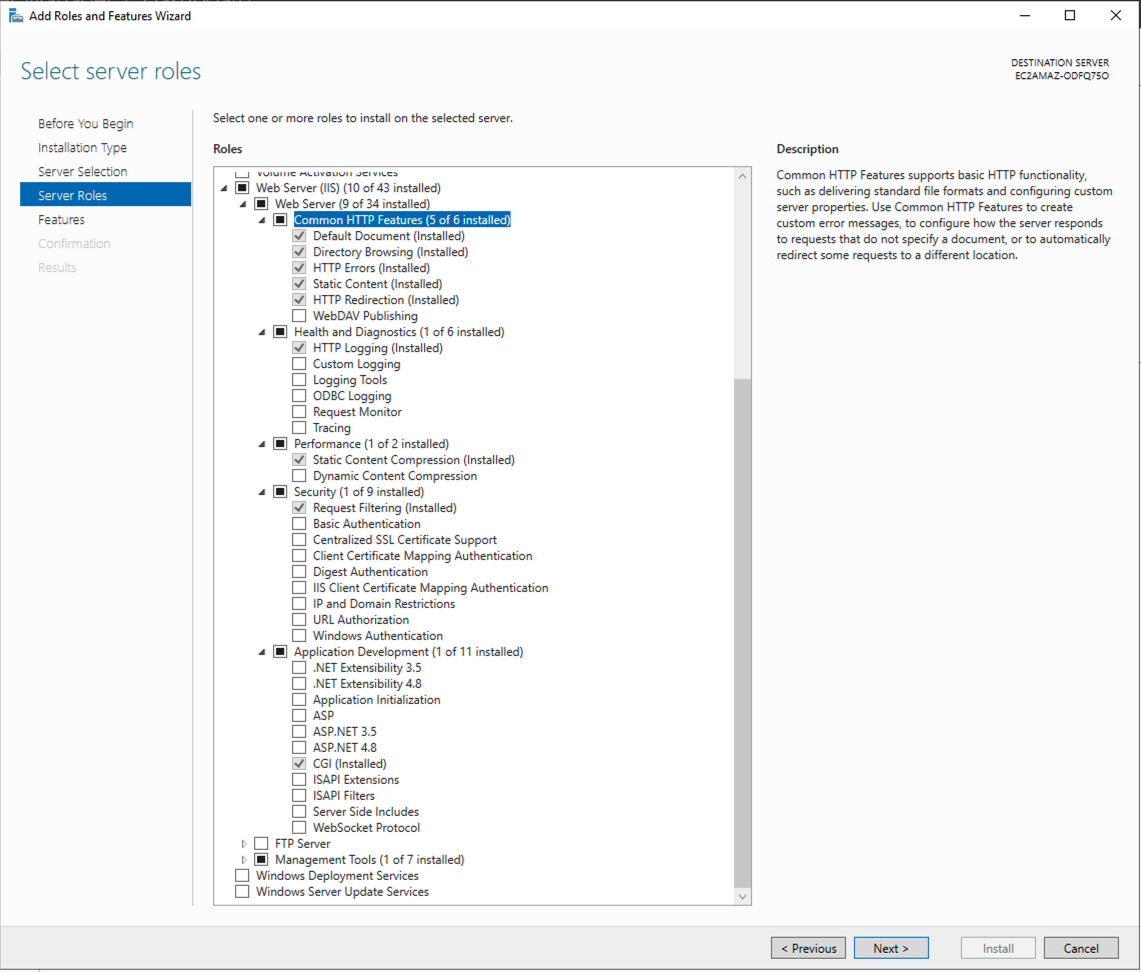
- Click Next and then select Install. Let the installer run in the background, reup on coffee and start the download section below.
Web server roles
These are the web server roles DreamFactory recommends selecting:
- Web Server (IIS)
- Common HTTP Features
- Default Document
- Directory Browsing
- HTTP Errors
- Static Content
- HTTP Redirection
- Health and Diagnostics
- HTTP Logging
- Performance
- Static Content Compression
- Security
- Request Filtering
- Application Development
- CGI
- Common HTTP Features
Downloads
There are a few installation files to download and, in some cases, installed. This section covers the downloads needed before starting the actual installation and configuration of the server. Getting all of these files on the server ahead of time ensures that the rest of the installation runs smoothly.
DreamFactory specific files
Before starting, locate the following files on the server so they are ready to add to the installation when needed.
- Composer (license) files:
- composer.json
- composer.json-dist
- composer.lock
- DreamFactory license key
The composer files are typically grabbed from the DreamFactory SFTP server. Contact DreamFactory support if you need help accessing them.
Git
The git command must be available to get the DreamFactory code later in the installation process.
Git can be downloaded from here. Select the 64-bit Git for Windows Setup version.
To install git, simply run the installer you downloaded and click yes/next on all default options.
Visual C++ 2015-2019
Download here
Simply run the installer to install.
URL rewrite module
Download here
Simply run the installer to install.
PHP
PHP for Windows can be downloaded here. Be sure to get a 64-bit, non-thread-safe (NTS) version. Download the .zip file.
At the time of writing, the latest supported PHP version is 8.3.16. The 64-bit NTS version can be directly downloaded here.
Just get the .zip downloaded. It is installed later in the process.
Composer
Composer is a package manager for PHP. The installer can be directly downloaded here.
Just get the installer downloaded. It is run later in the process.
PHP Manager
PHP Manager is an IIS utility to make managing PHP and extensions much easier.
Go to the link here and click Download this extension.
Simply run the downloaded installer while IIS is closed to complete the install.
SQL Server drivers
If you plan to use DreamFactory to connect to a SQL Server, you must have the driver packages.
Start with downloading the v17 and v18 drivers:
Run both downloaded installers.
For the drivers to be used, you also need the sqlsrv PHP extensions. Start by going to the releases page here.
Find the latest release and look in the assets section. Windows packages are at the end of the list. Download the Windows_5.12.0RTW.zip for PHP v8.3.
As of this writing, the latest release of the extension package can be directly downloaded here.
Getting DreamFactory running
The rest of the procedure involves two primary objectives: getting DreamFactory installed and running with the PHP development server, and then configuring IIS to serve DreamFactory. This section cover the installation and PHP development server set up.
Installing PHP
-
Create a new folder:
C:\php\, grab the PHP installation .zip you gathered earlier, and extract the entire contents to theC:\php\folder. -
Duplicate (copy/paste) the
php.ini-developmentfile, and rename the duplicatephp.ini.
You might need to enable file name extentions in the View tab of the file explorer.
- Open the newly created php.ini and copy/paste the following at the bottom of the file:
; Extensions required by DreamFactory
extension=ldap
extension=curl
extension=ffi
extension=ftp
extension=fileinfo
extension=gd
extension=intl
extension=mbstring
extension=exif
extension=mysqli
extension=odbc
extension=openssl
extension=pdo_mysql
extension=pdo_odbc
extension=pdo_pgsql
extension=pdo_sqlite
extension=pgsql
extension=shmop
extension=soap
extension=sockets
extension=sodium
extension=sqlite3
extension=tidy
extension=xsl
extension=php_pdo_sqlsrv.dll
extension=php_sqlsrv.dll

; OPcache — required for acceptable performance
zend_extension=opcache
opcache.enable=1
opcache.memory_consumption=256
opcache.interned_strings_buffer=16
opcache.max_accelerated_files=20000
opcache.revalidate_freq=0
opcache.validate_timestamps=1
opcache.fast_shutdown=1
opcache.enable_cli=0

; DreamFactory recommended PHP settings
memory_limit=256M
max_execution_time=300
max_input_time=300
post_max_size=100M
upload_max_filesize=100M
cgi.fix_pathinfo=0
display_errors=Off
display_startup_errors=Off
expose_php=Off
date.timezone=UTC
- Save and close php.ini.
The memory_limit of 256M is a minimum. If you're running complex joins, large result sets, or heavy scripting workloads, increase to 512M.
Do not skip the OPcache tuning block. Running OPcache with default settings on a DreamFactory installation will result in degraded performance — DreamFactory's codebase exceeds the default max_accelerated_files limit of 10,000 files.
You can manually add PHP to your enviornment variable path, however this is done automatically during the Composer installation.
Installing Composer
To start, run the composer installer you downloaded earlier.
You can select Next through most of the installation. When asked to browse to your command line/CLI PHP, navigate to: C:\php\php.exe. Then check the Add to path option. Click Next and wait.
This is a great time to test both the PHP and Composer installations, open a new commmand prompt and run:
php -v
composer --version
If both of those commands are successful, you are safe to keep moving forward.
Installing SQL Server drivers (optional)
This is an optional step dependent on if you intend to use DreamFactory with SQL Server.
The v17 and v18 drivers should have been installed during the previous steps, if not, install them now.
Open the Windows_5.12.0RTW.zip downloaded earlier, in the x64 folder there should be 4 .dll files. Copy/paste the two nts (Non Thread Safe) .dll into your php ext folder (C:\php\ext\)
Then, rename both files removing the "_83_nts" at the end of the filename. The files are named:
- php_pdo_sqlsrv.dll
- php_sqlsrv.dll
Get (git) DreamFactory code
Next, get the DreamFactory code by opening a command prompt, and running:
cd C:\inetpub\wwwroot\
git clone https://github.com/dreamfactorysoftware/dreamfactory
This creates a C:\inetpub\wwwroot\dreamfactory folder on the server, refered to as the DreamFactory installation folder in this and other documentation.
Install DreamFactory dependencies
DreamFactory uses Composer to handle all PHP dependencies, if you haven't installed Composer from the installation section above, do so now.
First, take your 3 composer/license files (composer.json, composer.json-dist, composer.lock) and add them to the DreamFactory installation directory, overwriting the existing composer files in that directory. Then, open a command prompt, cd into the dreamfactory installation directory and run:
composer install --no-dev --ignore-platform-reqs --verbose
Sometimes this command takes a while to run, if it feels hung, hit enter a couple times in the command prompt.
Build DreamFactory system database and root admin
Once the composer install finishes, we can finalize the DreamFactory setup. In your command prompt, cd into the dreamfactory installation directory. Start by running:
php artisan df:env --df_install=Windows.
This command defines the system database for the DreamFactory environment. For initial installation, it is recommended to start with option [0], Sqlite. If you run into problems during the installation, starting with sqlite eliminates database/networking issues from the troubleshooting process. This database can be changed at a later date, and any configurations you build in sqlite can be exported and imported into another instance later.
When selecting a database name and user, it is recommended to stick with the default "dreamfactory" and "dfadmin" respectively.
Once the df:env command finishes, run:
php artisan df:setup
This command prompts you to create your first admin user. This email and password are used to log in to the UI later. The root admin account details can be changed later.
Finally, add your license key to the end of the .env file located in the dreamfactory installation directory. You can add it to the bottom of the file like:
DF_LICENSE_KEY={YOUR LICENSE KEY}
Production .env settings
Before going live, update the following values in your .env file. The defaults from df:env are appropriate for initial setup and testing but must be changed for any production or customer-facing deployment:
APP_ENV=production
APP_DEBUG=false
APP_LOG_LEVEL=warning
| Setting | Dev Default | Production Value | Why |
|---|---|---|---|
APP_ENV | local | production | Enables Laravel production optimizations |
APP_DEBUG | true | false | Prevents stack traces from appearing in API error responses |
APP_LOG_LEVEL | debug | warning | Prevents logs from flooding with routine request/response info |
Leaving APP_DEBUG=true in production means every PHP exception will return a full stack trace — including file paths, SQL queries, and environment details — to anyone calling your API. Change this before pointing any external traffic at the server.
Test DreamFactory
In order to run a test/development Laravel server, from the dreamfactory installation directory run:
php artisan serve
This starts a web server at http://127.0.0.1:8000. If you can navigate to this url, login to the UI with the root admin created earlier. If you don't have a red banner at the top of the UI, you have done everything correctly. If the red banner is still visible, go back and check for any steps you may have missed before moving forward.
From here, DreamFactory is installed, the next section focuses on getting IIS to serve DreamFactory on port 80.
Serving DreamFactory with IIS
This section highlights the IIS configuration needed to serve DreamFactory.
We at DreamFactory are not Windows experts. The guidance provided here outlines a basic, default IIS configuration that has been tested and is known to work with DreamFactory on Windows environments. This setup is intended as a foundation for your DreamFactory installation. It's important to understand that while this configuration works for us and is supported by our team, Windows and IIS are versatile platforms. As such, there may be alternative configurations that also work well, depending on your specific needs and environment. We encourage you to use this as a guide, but feel free to explore and implement what works best for your situation.
To begin, open the IIS manager, most of the steps here take place in the IIS manager.
Create DreamFactory site
In the left panel of the IIS manager UI, open sites, right click, and select remove the default site.
Next, right click on the sites folder and select Add Website. Then fill in the dialog:
- Site name: typically set to "dreamfactory" but can be whatever you'd like
- Physical Path:
{dreamfactory install dir}/publicif you've been following along this should be:C:\inetpub\wwwroot\dreamfactory\public\ - Connect as...
- For the default DreamFactory configuration, the "Connect As" should be set to a local server Administrator account set under the Specific User option. Other options such as domain users can be used, however you might run into permission issues that will need to be solved. DreamFactory support is able to support the local Administrator account, but is unable to help with setting domain/non-local admin account permissions.
- Use the "Test Settings" button, and ensure you have two green check marks.
Due to the vast diversity in Windows environments, initial testing of DreamFactory necessitates the use of the local Administrator account. If DreamFactory is accessible with the local Administrator account but encounters issues with domain or non-admin user accounts, the problem often stems from permissions issues. We strongly recommend and support the use of the local Administrator account. Troubleshooting permission issues is often required for non-admin accounts to resolve access discrepancies.
Handler mappings
Handler mappings tell IIS how/where to use the php executables in serving DreamFactory. Select the server on the left side of the IIS manager and click on the Handler Mappings icon. To create a new mapping, on the right side of the page, click Add Module Mapping.
Fill in the Add Module Mapping dialog:
- Request Path:
*.php - Module:
FastCgiModule - Executable:
C:\php\php-cgi.exe - Name:
PHP_via_FastCGI
Next, click on request restricions, and ensure the following are set:
- Mapping: file or folder
- Verbs: all
- Access: script
Click OK to save the handler mapping.
PHP manager config
Again, from the server view on the left, click on the PHP Manager icon.
Generally a yellow notice that your PHP configuration is non optimal is displayed. Click on View Recommendations, check the boxes and apply every available recommendation.
Test that PHP is working, click the Check phpinfo() link and then test using the DreamFactory site. Ensure that you see a purple and white PHP info output in this screen. If not, go back and resolve any PHP installation issues.
If your php.ini is built correctly you should be able to access Enable or disable an extension and see them enabled. You can also enable extensions manually in the PHP Manager which applies the appropriate edits to the php.ini file.
FastCGI settings
There are a few setting changes to make to the default FastCGI configuration.
From the server view, select FastCGI Settings, then select the handler you made earlier and click Edit....
Make the following changes:
| Setting | Value | Why |
|---|---|---|
| Standard Error Mode | IgnoreAndReturn200 | Prevents PHP stderr from generating IIS 500 errors |
| Activity Timeout | 120 | Gives PHP scripts enough time to complete |
| Request Timeout | 300 | Must be ≥ max_execution_time in php.ini |
| Max Instances | 20 | Allows concurrent requests; increase for high-traffic installs |
Click OK to save.
The Standard Error Mode change is required. Leaving it at the default ReturnStdErrIn500 will cause DreamFactory to return 500 errors for normal PHP warnings and notices.
Application Pool tuning
From the IIS Manager left panel, click Application Pools, select the DreamFactory pool, and click Advanced Settings on the right.
Make the following changes:
| Setting | Value | Why |
|---|---|---|
| Start Mode | AlwaysRunning | Eliminates cold-start latency after app pool recycles |
| Idle Time-out (minutes) | 0 | Prevents IIS from suspending the pool between requests |
Click OK to save, then recycle the app pool.
Request filtering
From the server view, select the Request Filtering icon. Then Navigate to the HTTP Verbs tab. On the right side, click Allow Verb and add the following verbs one at a time:
- GET
- HEAD
- POST
- DELETE
- PUT
- PATCH
URL rewrite rules
On the left side of the IIS management window, open the DreamFactory site, and select the URL Rewrite module. To import the URL rewrite rules:
- on the right side of the page, click Import Rules.
- Browse to the dreamfactory/public dir and open .htaccess.
- Click Import.
- If any of the imported rules have red Xs on them, select them and remove that specific rule until everything shows a green checkmark.
- Click Apply to complete the process.
Directory permissions
IIS needs control over certian folders within the DreamFactory installation directory in order to function properly. Right click and select Properties on the following folders and give IIS_IUSRS full control over them. Additionally, be sure to unckeck the read only option, and apply all changes recursively if asked:
storagebootstrap/cachepublic
Sometimes these permisions don't set correctly with the properties window. If you are having permissions issues, we have seen good results by running these two commands from the DreamFactory install directory:
icacls "bootstrap\cache" /grant "IIS_IUSRS:(OI)(CI)F"
icacls "storage" /grant "IIS_IUSRS:(OI)(CI)F"
Accessing DreamFactory
After completing the setup, you can navigate to the server's IP address or hostname to view the DreamFactory login screen on port 80. At this stage, DreamFactory is operational. However, implementing SSL and creating a DNS entry for the server are some of the many additional configuration options at your disposal. Due to the extensive variety of configurations possible beyond this point, this guide does not cover them in detail. For more advanced IIS configuration, consult Microsoft's documentation as needed.
Post-Installation Configuration
Scheduled task (required for DreamFactory scheduler)
DreamFactory includes a built-in task scheduler for running scripts, reports, and maintenance on a schedule. For it to work, Windows Task Scheduler must call php artisan schedule:run every minute.
Open Task Scheduler and create a new task with the following settings:
- Name:
DreamFactory Scheduler - Trigger: Daily, repeat every 1 minute indefinitely
- Action: Start a program
- Program:
C:\php\php.exe - Arguments:
artisan schedule:run - Start in:
C:\inetpub\wwwroot\dreamfactory
- Program:
- Run whether user is logged on or not: checked
- Run with highest privileges: checked
Without this task, any scheduled scripts or workflows configured in the DreamFactory UI will never execute. There will be no error — they just won't run.
Node.js scripting on IIS — known issue
If you are using Node.js scripted APIs with platform.api.post() (or PUT/PATCH) for internal loopback calls, you must explicitly pass a Content-Length header. Without it, Node.js uses chunked transfer encoding, which IIS/FastCGI does not handle correctly on loopback connections — the request hangs until FastCGI's request timeout fires.
This affects POST, PUT, and PATCH only. GET is not affected.
Add Content-Length to every platform.api.post() call:
const payload = JSON.stringify({ resource: [record] });

platform.api.post('myservice/_table/mytable', payload, {
    'Content-Type': 'application/json',
    'Content-Length': Buffer.byteLength(payload)  // required on IIS
}, function(result, response) {
    // handler
});
The same applies to platform.api.put() and platform.api.patch().
Scripting temp file cleanup
DreamFactory writes temporary files to storage\scripting\ when executing Node.js scripts. These files are not automatically cleaned up. On a busy instance they will accumulate over time.
Add a second scheduled task to clean up files older than 1 day:
- Name:
DreamFactory Scripting Cleanup - Trigger: Daily at a low-traffic time (e.g. 2:00 AM)
- Action: Start a program
- Program:
cmd.exe - Arguments:
/c forfiles /p "C:\inetpub\wwwroot\dreamfactory\storage\scripting" /s /m *.js /d -1 /c "cmd /c del @path" 2>nul
- Program:
Adding SSL
For details on adding SSL, DreamFactory recommends using certbot. Follow the instructions from the provided link to help you through the process.
Installing Oracle Driver
The process of installing Oracle drivers is a more manual process than with our Linux installers. To begin you will need to download 3 things:
- The Oracle "Basic" Instant Client package from Oracle's Website (Example file instantclient-basic-windows.x64-23.7.0.25.01.zip)
- The Oracle "SDK" Instant Client Package from Oracle's Website (Example file instantclient-sdk-windows.x64-23.7.0.25.01.zip)
- The PHP oci8 extension (DLL) available at Pecl PHP Site By default, DreamFactory runs on PHP 8.3 so you will want the x64 package of that (version 3.2.1). If you are running DreamFactory using IIS as your webserver you must be using the non thread safe version of PHP.

-
Note you will want to click on the DLL button under downloads on the Pecl site for windows .dll files -
Unless you have good reason, choose the appropriate DLLs with the NTS tag -
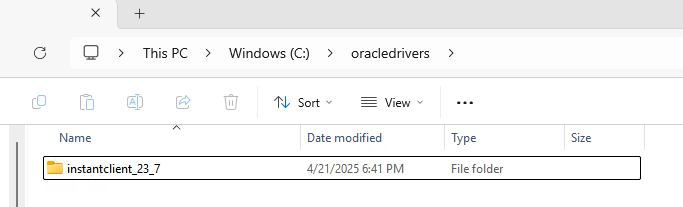
Next you will create a folder where the Oracle drivers will be kept, for example
C:\oracledriversand extract the Oracle "Basic" Instant Client there. The files will be extracted into a subdirectory calledinstantclient_<version>.Example:
C:\oracledrivers\instantclient23_7
- Next we will extract the "SDK" Instant Client to the same folder i.e.
C:\oracledrivers. We want the SDK package to extract into the same subdirectory as in the previous step, not a new folder. Your driver folder should look like this:
- and the subdirectory should look like:
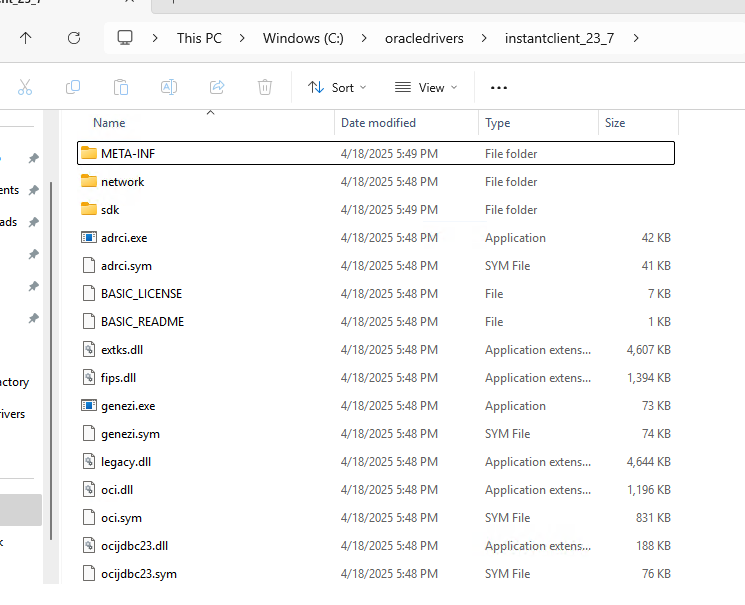
- Note that there is now an
SDKfolder inside.
Next, we need to add the full path of the Instant Client to the environment variables OCI_LIB64 and PATH. The quickest way to get to Environment Variables is to use the windows search bar and search for "environment" click on Environment Variables and then:
- Under System Variables, create OCI_LIB64 if it does not already exist. Set the value of OCI_LIB64 to the full path of the location of Instant Client.
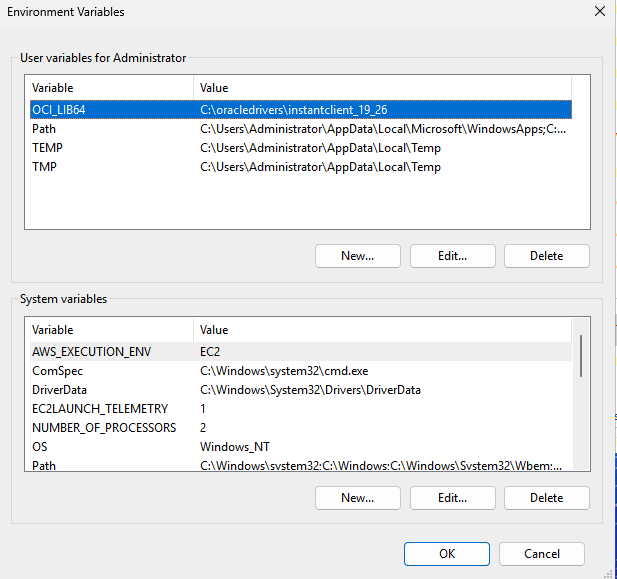
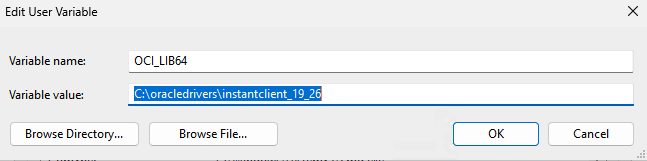
2.Under System Variables, edit PATH to include the same (C:\oracledrivers\instantclient_23_7)
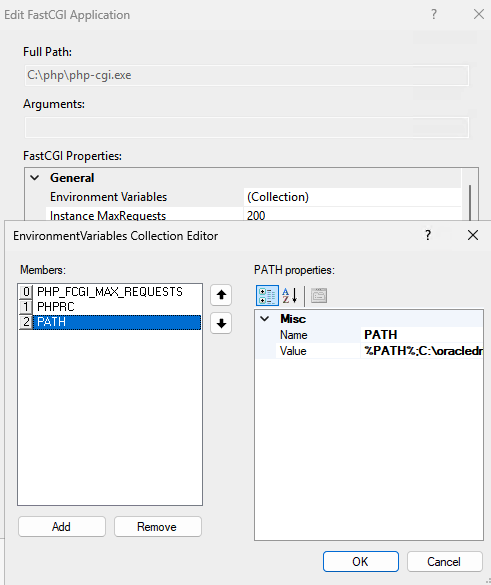
When utilizing the IIS web server, it is essential to include a new variable PATH in your FastCGI environment.
For example, a new variable could be: %PATH%;C:\oracledrivers\instantclient_23_7.
The fastCGI path is located in the IIS Manager > Your Server > fastCGI Settings > Full Path > Edit > 3 dots next to collections
Almost there! Now, the last thing to do is to extract our PHP OCI8 extension package (It will be named along the lines of php_oci8-3.2.1-8.3-nts-vc15-x64) and move the php_oci8.dll file to the ext directory where PHP is located on your system (e.g PHP\v8.3\ext). Once that is done add extension=php_oci8.dll to your php.ini file and then restart the IIS server (use php -m to make sure that the oci8 extension is installed). Congratulations!
MCP Daemon
If you plan to use the MCP Service, you must also run the background daemon server. This can be done using the provided PowerShell script:
cd {dreamfactory path}\vendor\dreamfactory\df-mcp-server\scripts
.\start-daemon-win.ps1
The script will automatically:
- Install all required npm dependencies.
- Start the daemon in the background using npx tsx.
- Use default host 127.0.0.1 and port 8006, unless overridden via environment variables:
- MCP_DAEMON_HOST — host to bind the daemon (default: 127.0.0.1)
- MCP_DAEMON_PORT — port to bind the daemon (default: 8006)
- NODE_ENV — Node environment (default: production)
After starting, you can verify the daemon is running by checking its health endpoint:
Invoke-WebRequest -Uri http://127.0.0.1:8006/health -UseBasicParsing
Troubleshooting Common Windows Installation Issues
'Class not found' or autoload errors
Error: Fatal error: Class 'DreamFactory\...' not found
Cause: Composer dependencies have not been installed, or the autoloader is out of date.
Fix: Run Composer install from the DreamFactory installation directory:
cd C:\inetpub\wwwroot\dreamfactory
composer install --no-dev --ignore-platform-reqs
If you have already run composer install and the error persists, try regenerating the autoloader:
composer dump-autoload
IIS 500.19 — Configuration error
Error: HTTP Error 500.19 - The requested page cannot be accessed because the related configuration data for the page is invalid.
Cause: IIS cannot read the web.config file, usually due to a missing URL Rewrite module or incorrect file permissions on applicationHost.config.
Fix: Confirm the URL Rewrite module is installed (restart IIS after installation). If the module is installed, check that the IIS_IUSRS group has Read permissions on the C:\inetpub\wwwroot\dreamfactory\public directory.
PHP extension load failures — missing VC++ redistributable
Error: PHP Startup: Unable to load dynamic library 'curl' or similar extension load error in PHP logs.
Cause: PHP extensions on Windows depend on the Visual C++ runtime. If the correct VC++ redistributable version is not installed, extensions silently fail to load.
Fix: Download and install the Visual C++ 2015–2019 Redistributable (x64), then restart IIS:
iisreset
Verify extensions load correctly by running:
php -m
All extensions listed in php.ini should appear in the output. Missing extensions indicate a load failure — check the PHP error log at C:\php\logs\php_errors.log.
'php_sodium.dll not found' or sodium extension error
Error: PHP Startup: Unable to load dynamic library 'sodium'
Cause: The sodium extension requires the Non-Thread-Safe (NTS) PHP build when used with IIS FastCGI. The Thread-Safe (TS) build includes a different sodium DLL that conflicts with IIS.
Fix: Confirm you downloaded the NTS version of PHP from windows.php.net. The filename should contain nts (e.g., php-8.3.x-nts-Win32-vs16-x64.zip). Replace your PHP installation with the NTS build if needed.
White screen or blank page after IIS setup
Error: Browser shows a blank white page with no error when accessing DreamFactory through IIS.
Cause: FastCGI Standard Error Mode is set to return the PHP error in the response body, which IIS then suppresses.
Fix: In IIS Manager, go to the server view > FastCGI Settings > select the PHP handler > Edit > change Standard Error Mode to IgnoreAndReturn200.
php artisan commands fail with database errors during setup
Error: SQLSTATE[HY000] [2002] No connection could be made or similar database error when running php artisan df:env.
Fix: For initial setup, select SQLite (option 0) when prompted by php artisan df:env. SQLite requires no external database server and eliminates network connectivity as a variable during troubleshooting. You can migrate to MySQL or PostgreSQL after confirming the base installation works.
Verifying the Installation
Once IIS is configured and DreamFactory is running, verify the installation is functional:
1. Check the system environment endpoint
From the Windows server (or from a client that can reach the server), run:
Invoke-WebRequest -Uri http://localhost/api/v2/system/environment -UseBasicParsing
A successful response returns HTTP 200 with JSON containing DreamFactory version, PHP version, and platform information. A 500 error indicates a PHP or application configuration issue; check C:\inetpub\wwwroot\dreamfactory\storage\logs\dreamfactory.log for details.
2. Access the admin UI
Navigate to http://localhost (or the server's IP/hostname) in a browser. You should see the DreamFactory login screen. Log in using the admin credentials created during php artisan df:setup.
3. Confirm no red banner
After logging in, verify there is no red banner at the top of the admin UI. A red banner indicates a configuration issue — common causes include a missing or invalid license key, or a failed database connection. If a banner appears, check the .env file in the DreamFactory installation directory and confirm DF_LICENSE_KEY is set correctly (no curly braces).
4. Create admin user via CLI (if setup was skipped)
If you need to create or reset the admin account via command line:
cd C:\inetpub\wwwroot\dreamfactory
php artisan df:create-admin-user
Follow the prompts to set the email and password for the administrator account.
5. Make a test API call
Once logged in, create a test database service (SQLite works with no external dependency). Then verify the generated API responds correctly:
# Replace YOUR_API_KEY with a key generated in the admin UI
Invoke-WebRequest -Uri "http://localhost/api/v2/YOUR_SERVICE_NAME/_table" `
  -Headers @{"X-DreamFactory-Api-Key" = "YOUR_API_KEY"} `
  -UseBasicParsing
A 200 response with a JSON resource array confirms the API is working end-to-end.
For additional configuration options including SSL setup and DNS configuration, see the DreamFactory configuration guide.